

Introduction #
From a tech perspective, Starlink is a revolutionary service offering fast, reliable, and (surprisingly) affordable internet connectivity at places where the landline/cable/fiber network is lacking.
This is achieved by operating an impressive number of low-orbit satellites (satellite internet constellation), relaying traffic between Starlink terminals (dishy) and ground stations. The ground stations have fast and stable internet connectivity, via e.g. fiber networks. It is really an impressive concept, but the operating principles are outside the scope of this blog post. If you would like to learn more about Starlink’s operating principles, I highly recommend checking Starlink’s Technology page, or the YouTube video: How does Starlink Satellite Internet Work?📡☄🖥.
At my parents’ place, sadly we don’t have any sort of ‘modern’ landline infrastructure (most of the area’s infra is from the 1970s), therefore landline internet connection offers (best case scenario) 10/0.8 Mbps (down/up). In addition to this, 5G reception is rather poor in this area, making it barely suitable for calling. Speedtest reports on 5G, show similar results as the ones of the landline connection. This is a rather disappointing situation, especially for tourists and people working from home.
All things considered, it seemed that the only way to have reliable internet connectivity was with a Starlink subscription.
Starlink’s infrastructure (as of gen3) consists of the following parts:

The challenge #
At any point in time, you can see real-time information about your Starlink’s status from their (very nicely designed) mobile app:
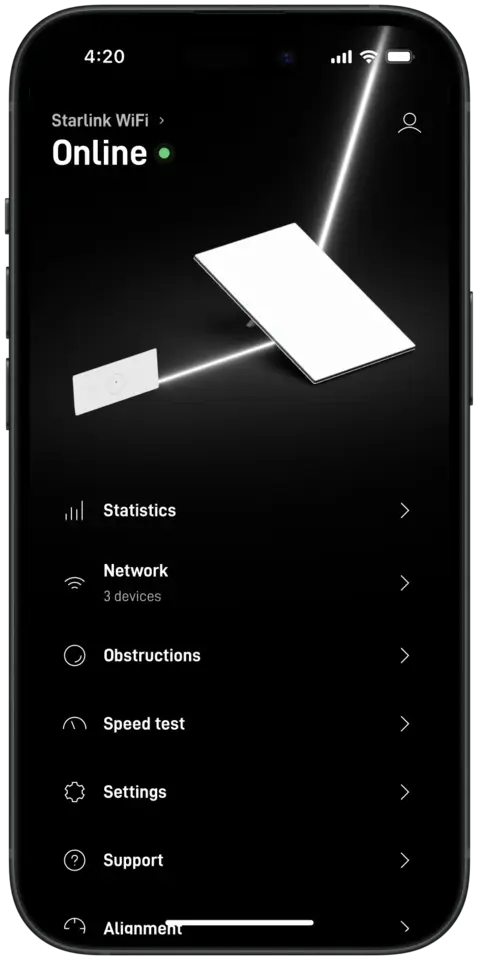
When connected directly on the Starlink router (e.g. via WiFi), the status data is fetched by internal endpoints. When not connected on the Starlink router, the data is fetched from Starlink’s telemetry system (this relies on cloud polling, which introduces a slight latency).
This approach works very well, as at any point in time, you can clearly see important infomation, like:
- How many devices are connected to your network
- Obstructions
- Real-time traffic usage
However, if you bring your own router (connected “behind” the Starlink router) and you connect on this (rather than on Starlink’s router), I noticed that the mobile app is not working as expected. Specifically, you cannot see any more information about Starlink’s router, causing the app to fall back to showing only the dish telemetry. This looks like the following picture in the app:
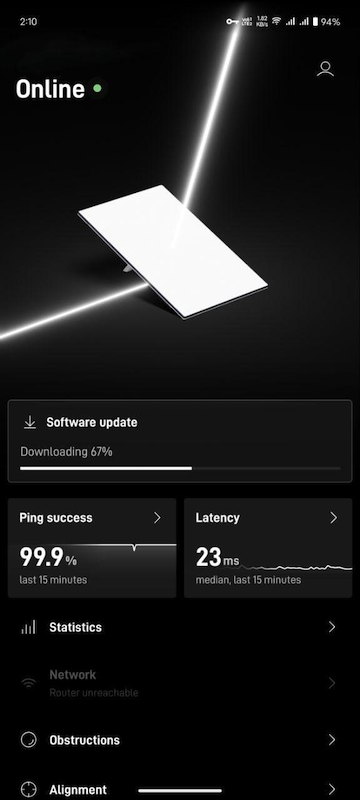
In this case, I do not have Starlink’s router in bypass mode. This means my network is effectively operating with double NATting.
Even though Starlink’s own router works quite well, sometimes you still have to bring your own router (e.g. for advanced firewalling, network segmentation, and similar cases). This is the primary reason why I have my own (MikroTik) router in place.
This made wonder:
Why is this happening?
Why can I see only information about the dish and nothing about the router?
Ghostbusting #
My first instinct was simple: Is my router blocking the path?
A quick test proved that I could still reach the Starlink local web interface at 192.168.1.1, as well as the dish information page at 192.168.100.1. The path was open, yet the app remained blind to the router’s stats.
Next, I had to find out which connections are made from Starlink’s mobile application, hoping this will give me more information on what might be breaking. In my case, I could do that by starting a packet capture using Mikrotik’s Packet Sniffer tool.
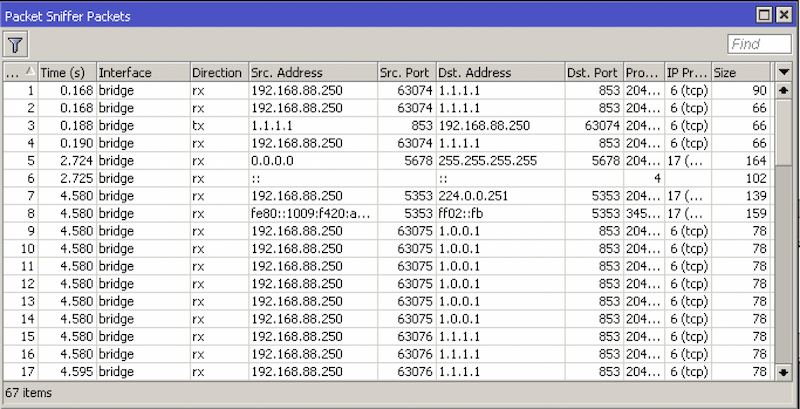
This analysis turned out to be quite revealing, as I noticed my phone (Starlink mobile app), was trying to connect to port 9005 (gRPC) at the provided gateway IP (10.50.0.1 in my case).
- On the one hand, the app was correctly resolving and fetching information from the dish (
192.168.100.1). - On the other hand, it seems (in the app) they do not use the same approach (?) to resolve the actual address of Starlink’s router, instead they seem to assume, this will be the gateway IP. In my case, though, the gateway IP is the one of my Mikrotik router, not the Starlink one.
It seems that the app “knows” where the dish is, but it “assumes” the router is the gateway.
The solution #
After analyzing the situation and collecting the above-mentioned observations, the solution was rather clear for me – I had to configure my own router to forward packets for its own IP (gateway) and port 9005, to the IP of Starlink’s router and same port.
Thankfully, MikroTik routers are extremely flexible with this kind of configurations. It is just a matter of adding:
In the command below, replace 10.50.0.1 with your MikroTik’s local Gateway IP and 192.168.1.1 with your Starlink Router’s IP.
/ip firewall nat
add action=dst-nat chain=dstnat comment="starlink router info" \
    dst-address=10.50.0.1 dst-port=9005 protocol=tcp \
    to-addresses=192.168.1.1 to-ports=9005
This adds a DST-NAT rule, forwarding packets from 10.50.0.1:9005 to 192.168.1.1:9005.
- Network Address Translation is an Internet standard that allows hosts on local area networks to use one set of IP addresses for internal communications and another set of IP addresses for external communications.
- Destination NAT or dstnat: This type of NAT is performed on packets that are destined for the natted network. It is most commonly used to make hosts on a private network to be accessible from the Internet. A NAT router performing dstnat replaces the destination IP address of an IP packet as it travels through the router toward a private network.
Conclusion #
By implementing this simple DST-NAT rule, we effectively “trick” the Starlink app into finding the router exactly where it expects to see it: at the network gateway. It’s a small adjustment, but it restores the full visibility of your network health, obstruction data, and real-time usage without having to switch back and forth between WiFi networks.
While this guide focused on MikroTik’s RouterOS, the logic remains the same for Ubiquiti UniFi, pfsense/OPNsense, or OpenWrt:
- Identify the port (
9005). - Identify the protocol (TCP).
- Redirect traffic hitting your gateway on that port to the Starlink Router’s IP.
If you ever change your local subnet or if Starlink updates their default gateway via a firmware update, you may need to update your NAT rule to reflect the new IP addresses.
I hope this helps you get your Starlink dashboard back to 100% functionality!